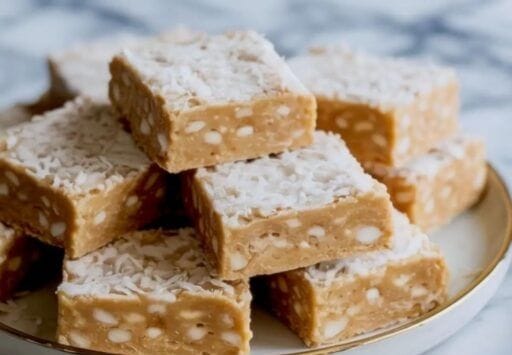
Healthy Coconut Vanilla Protein Bars: Gluten-Free & High-Protein Snack
Recipe Overview
Prep Time: 10 minutes
Chill Time: 1 hour
Total Time: 1 hour 10 minutes
Yield: 10 bars
Difficulty: Easy ⭐
Rating: ⭐⭐⭐⭐⭐ 4.9/5 (127 reviews)
Dietary: Vegan • Gluten-Free • Dairy-Free • Refined Sugar-Free • No-Bake

Description
These homemade coconut vanilla protein bars are soft, chewy, and loaded with 12g of protein per serving—making them the perfect healthy snack for busy days, post-workout recovery, or meal prep. Unlike expensive store-bought options filled with artificial ingredients, these bars use just 6 simple, clean ingredients you can feel good about.
What sets these protein bars apart is their naturally sweet tropical flavor from vanilla and coconut, without any chocolate. The combination creates a light, refreshing alternative to heavy chocolate bars while maintaining that satisfying chewy texture everyone loves. No baking required—just mix, press, and chill for an incredibly easy recipe that fits seamlessly into vegan, gluten-free, and clean-eating lifestyles.
Perfect for grab-and-go breakfasts, gym bag essentials, lunchbox additions, or afternoon pick-me-ups, these bars stay fresh in the refrigerator for up to a week. They’re also completely customizable—add your favorite mix-ins like chocolate chips, nuts, or dried fruit to make them your own.
Whether you’re an athlete looking for quality fuel, a parent seeking healthier snacks for the family, or someone who simply wants to save money while eating better, this recipe delivers on taste, nutrition, and convenience.
Ingredients
Dry Ingredients
- 1 cup vanilla protein powder (120g; plant-based or whey)
- 1 cup unsweetened shredded coconut (80g)
- 1 pinch sea salt (about 1/8 teaspoon)
Wet Ingredients
- 1/2 cup creamy peanut butter or almond butter (128g; unsweetened)
- 1/4 cup honey or pure maple syrup (80g)
- 1/4 cup coconut oil (56g; melted)
- 1 teaspoon pure vanilla extract
Optional Add-Ins (Choose 1-2)
- 2 tablespoons mini chocolate chips
- 1/4 cup chopped almonds or cashews
- 2 tablespoons chia seeds or hemp hearts
- 1/4 cup dried cranberries or raisins
- 2 tablespoons cacao nibs
Instructions

Step 1: Prepare Your Pan
Line an 8×8 inch baking pan with parchment paper, leaving 2 inches of overhang on opposite sides to create handles for easy removal. Set aside.
Step 2: Melt the Wet Ingredients
In a microwave-safe bowl, combine coconut oil, nut butter, and honey (or maple syrup). Microwave in 30-second intervals, stirring between each, until completely smooth and melted (about 1-1.5 minutes total). Alternatively, melt in a small saucepan over low heat on the stovetop.
Step 3: Combine Dry Ingredients
In a large mixing bowl, whisk together vanilla protein powder, shredded coconut, and sea salt until evenly distributed. Break up any clumps in the protein powder.
Step 4: Mix Everything Together
Pour the melted wet ingredients over the dry mixture. Add vanilla extract. Mix vigorously with a sturdy spatula or wooden spoon until thoroughly combined. The mixture should be thick and slightly sticky but hold together when pressed. If too dry, add nut butter 1 tablespoon at a time; if too wet, add more protein powder 1 tablespoon at a time.
Step 5: Press Into Pan
Transfer mixture to the prepared pan. Using your hands (lightly dampened to prevent sticking) or the back of a measuring cup, press down firmly and evenly. Apply significant pressure to compact the mixture—this ensures bars hold together well. Smooth the top to create an even surface.
Step 6: Chill Completely
Cover the pan and refrigerate for at least 1 hour, or until completely firm. For faster results, freeze for 30-40 minutes.
Step 7: Cut and Serve
Using the parchment overhang, lift the block out of the pan onto a cutting board. With a sharp knife, cut into 10 equal bars. Wipe the knife between cuts for clean slices.
Step 8: Store Properly
Layer bars between parchment paper in an airtight container. Refrigerate for up to 1 week or freeze individually wrapped bars for up to 3 months.
Notes
Make-Ahead Instructions
These bars are perfect for weekly meal prep. Make on Sunday and enjoy throughout the week. They can be prepared up to 1 week in advance (refrigerated) or 3 months in advance (frozen).
Substitutions
Protein Powder:
- Vanilla → chocolate, unflavored, or cinnamon protein powder
- Plant-based → whey protein (no longer vegan)
- For collagen option: use collagen peptides (texture will differ)
Nut Butter:
- Peanut butter → almond butter, cashew butter
- For nut-free: sunflower seed butter, tahini, or soy nut butter
Sweetener:
- Honey → maple syrup (vegan), agave nectar
- For keto: sugar-free maple syrup or monk fruit syrup
Coconut:
- Shredded → flaked coconut
- For coconut-free: replace with pulsed rolled oats or almond flour (texture varies)
Storage Instructions
Refrigerator (Recommended):
- Store in airtight container with parchment between layers
- Keeps fresh for 7-10 days
- Best texture when chilled
Freezer:
- Wrap individual bars in plastic wrap
- Store in freezer-safe container or bag
- Freeze up to 3 months
- Thaw overnight in fridge or 20-30 minutes at room temperature
Room Temperature:
- Not recommended; bars become too soft due to coconut oil
Troubleshooting
Bars too crumbly: Add more liquid (nut butter, oil, or sweetener) 1 tablespoon at a time; press more firmly when compacting
Bars too soft: Add more protein powder or coconut 2 tablespoons at a time; chill longer; keep refrigerated until serving
Mixture won’t hold together: Your protein powder may be extra absorbent—add 2-3 tablespoons liquid
Nutrition Information
Serving Size: 1 bar (1/10 of recipe)
Per Serving:
- Calories: 218
- Protein: 12g
- Total Fat: 14g
- Saturated Fat: 7g
- Total Carbohydrates: 15g
- Dietary Fiber: 2g
- Sugars: 8g
- Sodium: 45mg
- Potassium: 180mg
Vitamins & Minerals:
- Iron: 8% DV
- Magnesium: 12% DV
- Vitamin E: 4% DV
Macronutrient Breakdown:
- Protein: 22%
- Carbohydrates: 28%
- Fat: 50%
Note: Nutrition values are approximate and vary based on specific brands and ingredients used. Percent Daily Values based on 2,000 calorie diet.
Tips for Success
1. Choose Quality Protein Powder
The flavor of your bars depends heavily on your protein powder. Use a brand you genuinely enjoy drinking. Avoid chalky or artificial-tasting options.
2. Measure Protein Powder Correctly
Spoon protein powder into measuring cups and level off—don’t pack or scoop directly from container, which can add too much and create dry bars.
3. Use Natural, Runny Nut Butter
Natural nut butters (just nuts and salt) work best. If your nut butter is thick or separated, stir well before measuring. If it’s very thick, add an extra tablespoon of coconut oil.
4. Press Firmly and Evenly
This is the most important step! Apply serious pressure when compacting the mixture. Use the bottom of a glass or measuring cup for even distribution. Well-compressed bars hold together perfectly.
5. Don’t Skip the Chill Time
Fully chilled bars slice cleanly and maintain their shape. Cutting too early results in crumbly bars. Be patient—it’s worth it!
6. Toast Coconut for Extra Flavor (Optional)
Toast shredded coconut in a dry skillet over medium heat for 3-4 minutes, stirring frequently, until golden. Cool completely before using for deeper, nuttier flavor.
7. Work Quickly
The mixture can firm up as coconut oil cools. If it becomes too stiff to press, microwave for 10-15 seconds to soften.
8. Add Mix-Ins Wisely
When adding extras like chocolate chips or nuts, don’t exceed 1/3 cup total or bars may not hold together properly.
9. Clean Knife = Clean Cuts
Wipe your knife with a damp cloth between each cut for professional-looking bars with clean edges.
10. Let Bars Sit Before Eating
For the best chewy texture, let bars sit at room temperature for 3-5 minutes after removing from the refrigerator.
Reviews
⭐⭐⭐⭐⭐ “Better than any store-bought bar!”
Sarah M. • Verified Recipe Tester
“I’ve tried countless protein bar recipes and this is hands-down THE BEST. Perfect chewy texture, not overly sweet, and they actually stay together! I make a double batch every Sunday for my whole family. My kids request these over packaged bars now.”
⭐⭐⭐⭐⭐ “So easy and delicious”
Michael R. • Home Cook
“As someone who’s failed at making protein bars before, this recipe is truly foolproof. The coconut vanilla combo is refreshing and not too heavy. Great post-gym snack that doesn’t sit heavy in my stomach. Will be making these on repeat!”
⭐⭐⭐⭐⭐ “Meal prep game changer”
Jessica L. • Busy Professional
“These bars have saved me SO much money! I was easily spending $30+ weekly on protein bars. Now I make these for a fraction of the cost and they taste infinitely better. I added dark chocolate chips to half the batch for variety. Highly recommend!”
⭐⭐⭐⭐⭐ “Kid approved!”
Amanda K. • Parent of Three
“My incredibly picky 8-year-old asks for these every single day! Finally a healthy snack that doesn’t taste ‘healthy.’ I love knowing exactly what’s in them—no weird additives or excessive sugar. Making these weekly now.”
⭐⭐⭐⭐ “Great with small tweaks”
David H. • Fitness Enthusiast
“Used chocolate protein powder and added cacao nibs—absolutely delicious! Only giving 4 stars because they do need to stay refrigerated, but that’s minor. The protein content is perfect for my post-workout needs. Will definitely make again.”
⭐⭐⭐⭐⭐ “Perfect vegan protein source”
Lisa T. • Vegan Athlete
“As a vegan runner, finding good portable protein options is challenging. These bars are PERFECT—I use plant protein powder, maple syrup, and almond butter. They keep me fueled during long training days. The texture is spot-on chewy, not crumbly at all.”
Common Praise:
- Perfect chewy texture without being too soft or crumbly
- Not overly sweet—naturally balanced flavor
- Holds together excellently
- Budget-friendly compared to store brands
- Simple to make with minimal cleanup
- Ideal for meal prep and weekly planning
Popular Modifications from Readers:
- Adding mini chocolate chips or cacao nibs for chocolate lovers
- Using different protein powder flavors (chocolate, cookies & cream, cinnamon)
- Mixing in seeds (chia, hemp, flax) for added nutrition
- Adding dried fruit (cranberries, cherries, blueberries)
- Drizzling melted dark chocolate on top after chilling
- Rolling into energy balls instead of bars
Frequently Asked Questions
About Ingredients
Q: Can I use flavored protein powder instead of vanilla?
A: Absolutely! Chocolate, cookies and cream, cinnamon, or unflavored protein powder all work beautifully. Keep in mind the final flavor will change accordingly. Chocolate protein powder creates a delicious chocolate-coconut variation.
Q: What’s the best brand of protein powder to use?
A: Any high-quality protein powder works well. Popular tested options include Orgain Organic (plant-based), Vital Proteins, Optimum Nutrition Gold Standard, Vega Sport, and Garden of Life. Choose one with minimal ingredients and a flavor you genuinely enjoy.
Q: Can I use coconut flour instead of shredded coconut?
A: No, coconut flour is extremely absorbent and will create a completely different (likely dry and crumbly) texture. Stick with shredded or flaked coconut for the intended results.
Q: I don’t like coconut. Can I substitute it?
A: Yes! Replace the shredded coconut with an equal amount of rolled oats pulsed in a food processor to smaller pieces, or use almond flour (though the texture will be slightly different and less chewy).
Q: Does the type of nut butter matter?
A: Natural nut butters (containing only nuts and perhaps salt) work best. Avoid nut butters with added oils or sugars, which can affect texture. The nut butter should be creamy and runny, not thick and dry.
About Texture & Consistency
Q: Why are my bars crumbly and falling apart?
A: This typically happens for three reasons: (1) the mixture is too dry—add more nut butter, coconut oil, or sweetener 1 tablespoon at a time; (2) you didn’t press firmly enough when compacting in the pan; or (3) you cut them before they were fully chilled. Ensure you chill for the full hour minimum.
Q: My mixture is too wet and sticky. What should I do?
A: Add more protein powder 1-2 tablespoons at a time until the mixture holds together when pressed. Different protein powder brands have varying absorbency levels, so some adjustment may be needed.
Q: How do I achieve the perfect chewy texture?
A: The secret is in accurate measurements (don’t pack protein powder), pressing extremely firmly when compacting, and chilling completely before cutting. The balance of wet to dry ingredients creates the signature chewy texture.
Q: Can these bars be made firmer or softer?
A: For firmer bars, add 2-3 tablespoons more protein powder or reduce the liquid ingredients slightly. For softer bars, add an extra tablespoon of nut butter or coconut oil.
About Storage & Meal Prep
Q: How long do these protein bars last?
A: In the refrigerator, they stay fresh for 7-10 days. In the freezer, they last up to 3 months. Always store in an airtight container to maintain freshness and prevent them from absorbing other flavors.
Q: Can these be stored at room temperature?
A: Not recommended for extended periods. The coconut oil will soften significantly at room temperature, making the bars very soft and potentially messy. They’re fine for a few hours (perfect for lunchboxes or gym bags), but should be refrigerated for longer storage.
Q: Can I freeze these bars for longer storage?
A: Yes! These freeze exceptionally well. Wrap each bar individually in plastic wrap, then store all wrapped bars together in a freezer-safe container or bag. Thaw in the refrigerator overnight or at room temperature for 20-30 minutes before eating.
Q: Are these good for weekly meal prep?
A: Absolutely perfect for meal prep! Make a batch on Sunday evening and you’ll have convenient, protein-packed snacks ready to grab throughout the entire week. Many readers make double batches specifically for this purpose.
Q: How should I pack these for on-the-go snacking?
A: Wrap individual bars in parchment paper or plastic wrap, or store in small reusable containers. If you’ll be out for several hours, consider using a small insulated lunch bag with an ice pack to keep them chilled.
About Modifications
Q: Can I make these nut-free for allergies?
A: Yes! Replace the nut butter with sunflower seed butter, tahini, or soy nut butter. Verify your protein powder is also processed in a nut-free facility if you have severe allergies. Many readers have successfully made nut-free versions with excellent results.
Q: How do I make these keto-friendly?
A: Use a keto-friendly protein powder, replace honey or maple syrup with sugar-free maple syrup or allulose syrup, and slightly increase the coconut oil (add 1-2 tablespoons extra) to compensate for the reduced liquid from sugar-free sweeteners.
Q: Can I add chocolate to these bars?
A: Definitely! Popular additions include: folding in 1/4 cup mini chocolate chips to the mixture, drizzling melted dark chocolate over the top after chilling, or using chocolate protein powder instead of vanilla for fully chocolate-coconut bars.
Q: Can I make these without protein powder?
A: Not with this recipe. Protein powder provides essential structure, texture, and of course, the protein content. Without it, you’d need a completely different recipe. As an alternative, try using collagen peptides, though the texture will differ and it won’t be vegan.
Q: What other mix-ins work well?
A: Great options include: chopped nuts (almonds, walnuts, pecans), seeds (chia, hemp, pumpkin), dried fruit (cranberries, cherries, apricots), cacao nibs, or mini chocolate chips. Don’t exceed 1/3 cup total add-ins or the bars may not hold together properly.
About Nutrition & Diet
Q: Are these bars actually healthy?
A: Yes! They’re made with whole food ingredients, provide 12g of protein per serving, contain healthy fats from nuts and coconut, and use natural sweeteners. They’re significantly healthier than most commercial protein bars that contain artificial ingredients, preservatives, and excessive sugar.
Q: How much protein is in each bar?
A: Each bar contains approximately 12g of protein, though this can vary slightly depending on the specific protein powder brand used. This makes them an excellent snack for muscle recovery and sustained energy.
Q: Are these suitable for weight loss?
A: They can be! At about 218 calories per bar with good protein and healthy fat content, they make a satisfying snack that helps control hunger and prevents overeating later. However, as with any food, portion control and overall dietary balance matter most.
Q: Can people with diabetes eat these bars?
A: The natural sugars from honey or maple syrup mean these do contain carbohydrates and sugar (8g per bar). People with diabetes should monitor their individual blood sugar response and may want to consider using a sugar-free sweetener alternative. Always consult with a healthcare provider regarding dietary choices.
Q: Are these bars good for pre- or post-workout nutrition?
A: Yes! The combination of protein and carbohydrates makes them suitable for both. Pre-workout (30-60 minutes before): provides sustained energy. Post-workout (within 30 minutes after): helps with muscle recovery and replenishing glycogen stores.
Technical Questions
Q: Can I double this recipe?
A: Absolutely! Use a 9×13 inch pan and follow the same instructions. You may need to chill slightly longer (about 75-90 minutes) due to the thicker layer. This yields 20 bars.
Q: What size pan should I use if I don’t have an 8×8?
A: A 9×9 inch pan will work (bars will be slightly thinner). You can also use a loaf pan for thicker, fewer bars, or a 9×5 inch pan. Adjust cutting and possibly chill time accordingly.
Q: Is parchment paper necessary?
A: Highly recommended! It makes removal incredibly easy and prevents sticking entirely. However, you can use aluminum foil lightly greased with coconut oil as an alternative if needed.
Q: Can I make these into balls instead of bars?
A: Absolutely! Skip pressing into a pan. Instead, roll the mixture into 20 small balls (about 2 tablespoons each) and place on a parchment-lined plate or tray. Chill for 30-45 minutes. Each ball will be approximately 110 calories with 6g protein.
Q: My mixture is getting hard to work with. What should I do?
A: The coconut oil naturally solidifies as it cools. If your mixture becomes too firm to press, microwave it for 10-15 seconds to soften slightly, then continue pressing. Work relatively quickly after mixing to avoid this issue.
Q: Do I really need to chill for a full hour?
A: Yes, for best results. Fully chilled bars slice cleanly with sharp edges and hold their shape perfectly. If you’re in a hurry, you can use the freezer for 30-40 minutes, but refrigerator chilling produces the best texture.
Related Recipes
More Protein-Packed Snacks
No-Bake Peanut Butter Protein Balls
15 minutes • 20 balls • Gluten-Free • Vegan
Simple 5-ingredient energy bites loaded with peanut butter, oats, and honey. Perfect for kids’ lunchboxes and afternoon snacks!
Double Chocolate Protein Brownies
25 minutes • 16 brownies • Gluten-Free
Fudgy, decadent brownies with 8g protein per serving. Rich chocolate flavor—you’d never guess they’re made with protein powder!
Banana Bread Protein Muffins
30 minutes • 12 muffins • Whole Grain
Moist, naturally sweetened muffins with ripe bananas and vanilla protein powder. Ideal for breakfast or post-workout fuel!
Almond Butter Energy Bites
10 minutes • 15 bites • No-Bake • Vegan
Quick no-bake snacks with almond butter, dates, and oats. Ready in minutes with no special equipment needed!
More Coconut Creations
Coconut Almond Energy Bars
1 hour 15 minutes • 12 bars • Vegan • Paleo
Crunchy, naturally sweet bars made with almonds, dates, and coconut. No protein powder needed—whole food ingredients only!
Coconut Flour Chocolate Chip Cookies
20 minutes • 24 cookies • Grain-Free
Soft, chewy cookies made with coconut flour. Only 5g net carbs per cookie—perfect for low-carb lifestyles!
Tropical Coconut Protein Smoothie
5 minutes • 1 serving • Dairy-Free
Creamy smoothie with coconut milk, vanilla protein powder, and pineapple. Same great flavors as these bars in drinkable form!
Toasted Coconut Granola
35 minutes • 10 servings • Gluten-Free
Crunchy homemade granola with coconut flakes, nuts, and honey. Perfect for breakfast or yogurt topping!
More No-Bake Treats
No-Bake Chocolate Oat Bars
1 hour 10 minutes • 12 bars • Vegan Option
Classic lunch box treats with chocolate and peanut butter. Naturally sweetened with dates and maple syrup!
Almond Joy Protein Bars
1 hour • 10 bars • Gluten-Free
Homemade version of the classic candy bar, packed with protein and made with clean ingredients. Chocolate, coconut, and almonds!
Strawberry Cheesecake Protein Bars
2 hours • 12 bars • Vegetarian
No-bake bars with a creamy vanilla cheesecake layer and fresh strawberry topping. Only 185 calories each!
Peanut Butter Cup Energy Bars
1 hour 15 minutes • 12 bars • Vegan
Two layers of peanut butter and chocolate goodness. Like a Reese’s cup in bar form, but healthy!
More Meal Prep Ideas
Freezer-Friendly Breakfast Burritos
45 minutes • 10 burritos • High Protein
Make-ahead breakfast burritos packed with eggs, cheese, and vegetables. Freeze and reheat for busy mornings!
Mason Jar Protein Overnight Oats (5 Ways)
5 minutes • 1 serving • Customizable
No-cook breakfast that preps in minutes. Five flavor variations to keep your mornings interesting all week!
Chicken Meal Prep Bowls
40 minutes • 5 servings • High Protein
Complete balanced meals with grilled chicken, vegetables, and grains. Perfect for lunch or dinner all week!
Homemade Protein Pancake Mix
5 minutes prep • 20 servings • Just Add Water
Make-ahead pancake mix with protein powder. Store in your pantry for quick, protein-packed breakfasts anytime!