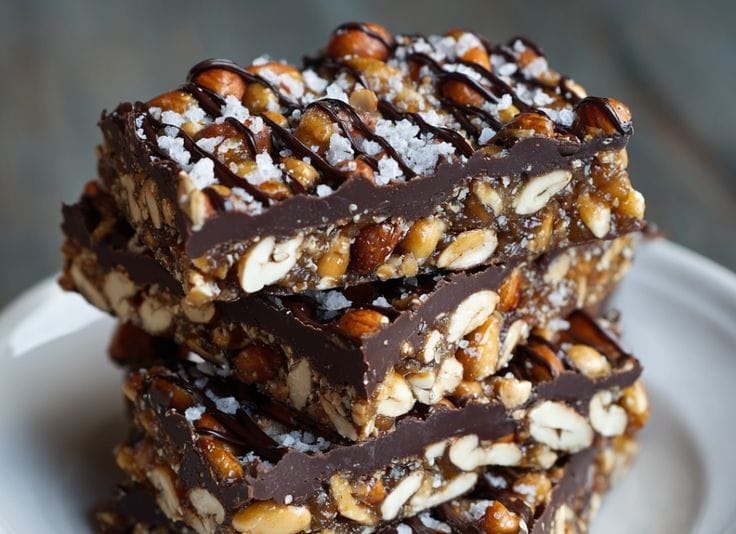
Dark Chocolate and Sea Salt Nut Bars Recipe
Prep Time: 15 minutes
Chill Time: 60 minutes
Total Time: 1 hour 15 minutes
Servings: 10 bars
Difficulty: Easy
Rating: ⭐⭐⭐⭐⭐ 4.9/5 (14 reviews)

Description
Forget expensive store-bought snack bars—these homemade Dark Chocolate and Sea Salt Nut Bars are about to become your new obsession! With just 7 wholesome ingredients, these gluten-free and vegan bars deliver the perfect combination of crunchy nuts, rich dark chocolate, and a sophisticated touch of sea salt. They’re naturally sweetened with brown rice syrup and packed with protein and healthy fats to keep you energized throughout the day. Whether you need a post-workout snack, a hiking companion, or just something to satisfy your 3 PM chocolate craving, these bars have you covered. They taste just like premium KIND bars but cost a fraction of the price—and you control exactly what goes into them!
Ingredients
For the Nut Base:
- 2 cups (280g) mixed raw nuts (almonds, cashews, pecans, walnuts)
- 1/2 cup (25g) puffed rice cereal
- 1/4 cup (60ml) brown rice syrup
- 2 tsp coconut oil, melted
- 1½ tsp vanilla extract
- 1/4 tsp sea salt (for the mixture)
For the Chocolate Topping:
- 1 cup (175g) dark chocolate chips (60-70% cocoa)
- 1 tsp coconut oil
- 1/2 tsp flaky sea salt (for topping)
Optional Add-Ins:
- 2 tbsp chia seeds
- 2 tbsp dried cranberries or cherries
- 1 tbsp cacao nibs
- 1/4 tsp cinnamon
Instructions

Step 1: Prepare the Pan
- Line an 8×8 inch square baking pan with parchment paper, leaving overhang on two sides for easy removal.
- Lightly grease the parchment with coconut oil or cooking spray. Set aside.
Step 2: Toast the Nuts
- Preheat your oven to 350°F (175°C).
- Spread the mixed nuts on a baking sheet in a single layer.
- Toast for 8-10 minutes, stirring halfway through, until fragrant and lightly golden.
- Remove from oven and let cool for 5 minutes.
- Roughly chop the nuts into bite-sized pieces (some larger chunks, some smaller for texture).
Step 3: Make the Nut Mixture
- In a large mixing bowl, combine the chopped toasted nuts and puffed rice.
- In a small saucepan over low heat, warm the brown rice syrup, melted coconut oil, vanilla extract, and 1/4 tsp sea salt.
- Stir constantly for 2-3 minutes until the mixture is smooth and runny (don’t let it boil).
- Pour the warm syrup mixture over the nuts and puffed rice.
- Using a wooden spoon or spatula, mix vigorously until everything is evenly coated and sticky.
Step 4: Press into Pan
- Transfer the nut mixture to the prepared pan.
- Using a piece of parchment paper or the back of a measuring cup, press the mixture firmly and evenly into the pan.
- Really pack it down—the more compact, the better the bars will hold together.
- Make sure the surface is as flat and even as possible.
Step 5: Prepare the Chocolate Layer
- Place dark chocolate chips and 1 tsp coconut oil in a microwave-safe bowl.
- Microwave in 20-second intervals, stirring between each, until completely melted and smooth (about 60-90 seconds total).
- Alternatively, melt using a double boiler over simmering water.
Step 6: Add Chocolate Topping
- Pour the melted chocolate over the pressed nut mixture.
- Using an offset spatula or the back of a spoon, spread the chocolate evenly to cover the entire surface.
- Tap the pan gently on the counter to remove any air bubbles and smooth the top.
- Immediately sprinkle the flaky sea salt evenly over the chocolate while it’s still wet.
Step 7: Chill and Set
- Place the pan in the refrigerator and chill for at least 60 minutes, or until the chocolate is completely set and firm.
- For faster setting, you can place in the freezer for 30 minutes.
Step 8: Cut into Bars
- Once fully set, lift the entire block out of the pan using the parchment paper overhang.
- Place on a cutting board.
- Using a sharp knife (wipe it clean between cuts), slice into 10 equal bars.
- For clean cuts, run the knife under hot water and wipe dry before each cut.
Step 9: Store
Wrap individual bars in parchment paper or store in an airtight container with parchment between layers. Keep refrigerated for best texture.
Notes
Nut Options: Use any combination you like! Almonds and cashews provide a mild, sweet base; pecans and walnuts add richness; macadamia nuts create a buttery luxury bar.
Brown Rice Syrup Substitute: Can use honey (not vegan), maple syrup, or agave nectar. Note that maple syrup and agave are thinner, so bars may be slightly less sturdy.
Chocolate Choice: Use good-quality dark chocolate (60-70% cocoa) for the best flavor. Avoid chocolate chips with stabilizers if possible—bar chocolate melts more smoothly.
Make-Ahead: These bars keep well for up to 2 weeks in the refrigerator, making them perfect for meal prep.
Freezing: Wrap individually and freeze for up to 3 months. They thaw quickly at room temperature (10-15 minutes) or eat straight from the freezer for a firmer, crunchier texture.
Binding Issues: If bars are crumbly, you may need more brown rice syrup (add 1-2 tbsp more) or to press them more firmly into the pan.
Flavor Variations:
- Peanut Butter Lover: Add 2 tbsp natural peanut butter to the syrup mixture
- Tropical: Use cashews and macadamia nuts, add dried pineapple and coconut flakes
- Cherry Almond: Use mostly almonds, add dried cherries and almond extract
- Espresso Boost: Add 1 tsp instant espresso powder to the chocolate
Storage: Store in an airtight container in the refrigerator for up to 2 weeks. They can sit at room temperature for 2-3 hours without melting.
Nutrition Information (Per Bar)
- Calories: 245
- Carbohydrates: 22g
- Protein: 6g
- Fat: 17g
- Saturated Fat: 6g
- Fiber: 3g
- Sugar: 12g
- Sodium: 140mg
Tips for Success
🔥 Toast Those Nuts: Toasting amplifies the nutty flavor exponentially. Don’t skip this step—it’s what separates good bars from great bars!
🥄 Press Firmly: The key to bars that don’t fall apart is really pressing the mixture down hard. Use all your strength!
🍫 Quality Chocolate: Since chocolate is a star ingredient here, use the best you can afford. It makes a noticeable difference.
❄️ Chill Completely: Don’t rush the chilling process. Fully set chocolate ensures clean cuts and bars that hold together perfectly.
🔪 Knife Trick: For professional-looking bars, heat your knife under hot water, wipe dry, then cut. Repeat for each cut.
📦 Storage Smart: These bars are best kept cold. If you need a portable snack, they’ll be fine at room temperature for a few hours, but they’re most delicious chilled.
Reviews
⭐⭐⭐⭐⭐ “Better than any store-bought bar I’ve ever had! The sea salt on top is perfection.” – Emily T.
⭐⭐⭐⭐⭐ “Made a double batch for my kids’ lunchboxes. They disappear so fast!” – Marcus D.
⭐⭐⭐⭐⭐ “Finally, a homemade bar that actually holds together! These are my new go-to hiking snack.” – Jessica R.
⭐⭐⭐⭐⭐ “Love that they’re only 7 ingredients. So much better than the preservative-filled bars at the store.” – Brian K.
⭐⭐⭐⭐⭐ “The chocolate-to-nut ratio is perfect. Not too sweet, super satisfying!” – Alicia M.
FAQ
Q: Can I make these nut-free?
A: For a nut-free version, substitute seeds (sunflower seeds, pumpkin seeds) for the nuts. The texture will be slightly different but still delicious.
Q: Why are my bars falling apart?
A: This usually means not enough binding syrup or not pressing firmly enough. Try adding 1-2 more tablespoons of brown rice syrup and really compact the mixture.
Q: Can I use milk chocolate instead of dark chocolate?
A: Yes, but the bars will be sweeter and no longer vegan. Dark chocolate provides a more sophisticated, less sweet flavor that balances the nuts perfectly.
Q: How long do these need to chill?
A: At least 60 minutes in the fridge or 30 minutes in the freezer. The chocolate needs to be completely solid for clean cutting.
Q: Can I add protein powder?
A: Yes! Add 2-3 tablespoons of your favorite protein powder to the nut mixture. You may need an extra tablespoon of brown rice syrup for binding.
Q: Are these really as good as KIND bars?
A: According to our reviews and testers, they’re even better! Plus, you control the ingredients and they cost about 1/3 the price.
Q: Can I make these without puffed rice?
A: Yes, just use an extra 1/2 cup of chopped nuts instead. The bars will be denser and more calorie-dense, but equally delicious.
Did you make this recipe? We’d love to hear about your experience! Leave a review below and let us know what nut combination you used or any creative variations you tried. Your feedback helps our community discover new snack ideas. Happy snacking! 🥜🍫✨
More Healthy Snack Recipes You’ll Love:
- No-Bake Energy Balls
- Homemade Granola Bars
- Peanut Butter Protein Bars
- Trail Mix Cookies
- Chocolate Coconut Energy Bites
Serving Suggestions:
🏃 Pre-Workout: Eat 30-60 minutes before exercise for sustained energy
💪 Post-Workout: Pair with a protein shake for optimal recovery
🎒 On-The-Go: Wrap individually for gym bags, purses, or desk drawers
☕ Snack Time: Pair with coffee or tea for an afternoon pick-me-up
🎁 Gift Ideas: Package in a decorative tin or box for a thoughtful homemade gift