Broken Window Glass Candy: A Stunning Edible Art Recipe That Will Amaze Your Guests
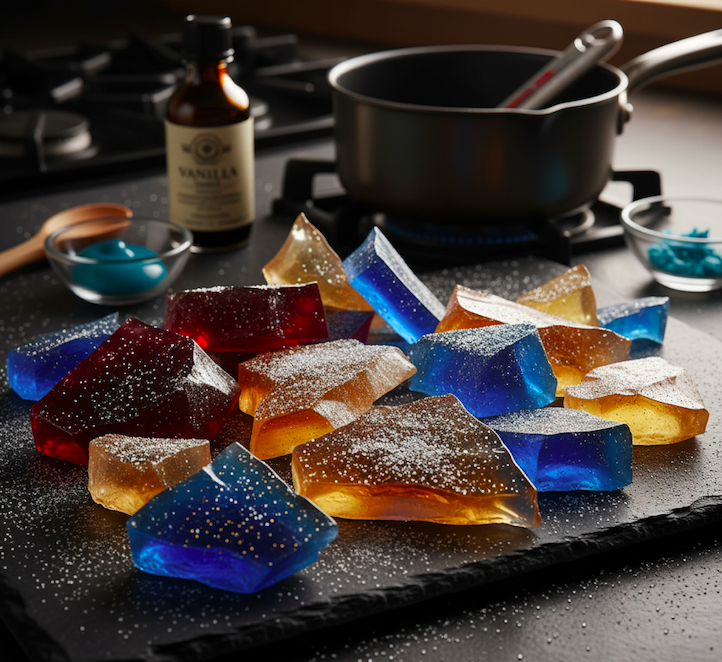
Have you ever wondered how to create something so visually striking that your guests will stop mid-conversation just to admire it? Meet Broken Window Glass candy – a mesmerizing confection that looks exactly like shattered glass but tastes like pure sweet magic. This show-stopping treat has been captivating candy lovers for decades, transforming simple sugar into an edible work of art that’s perfect for Halloween parties, theatrical productions, or any occasion where you want to add a touch of dramatic flair.
Originally popularized in American candy-making circles during the mid-20th century, Broken Window Glass candy gained fame as both a novelty confection and a practical prop for stage and film productions. What makes this recipe truly special is its incredible visual impact combined with surprisingly simple ingredients – you’re literally creating edible “glass” that cracks and crunches just like the real thing, but melts beautifully on your tongue with flavors ranging from classic vanilla to bold fruit combinations.
Table of Contents
Recipe Overview
Prep Time: 15 minutes
Cook Time: 20-25 minutes
Total Time: 35-40 minutes (plus 2-3 hours cooling time)
Servings: Makes approximately 2 pounds of candy (serves 12-15 people)
Difficulty Level: Beginner to Intermediate
Ingredients
| Main Ingredients | Amount | Possible Substitutions |
|---|---|---|
| Granulated sugar | 2 cups | Can use superfine sugar for smoother texture |
| Light corn syrup | ⅔ cup | Honey or golden syrup (may alter color slightly) |
| Water | ½ cup | Filtered water recommended |
| Food coloring (optional) | 3-5 drops | Gel coloring works best; liquid is acceptable |
| Flavoring extract | 1 teaspoon | Vanilla, peppermint, lemon, or any preferred flavor |
| Powdered sugar | 2 tablespoons | For dusting (prevents sticking) |
Optional Enhancement Ingredients:
- Edible glitter or luster dust for extra sparkle
- Different colored food coloring for layered effects
- Essential oils (food-grade only) for unique flavors
Step-by-Step Instructions
Preparation Phase
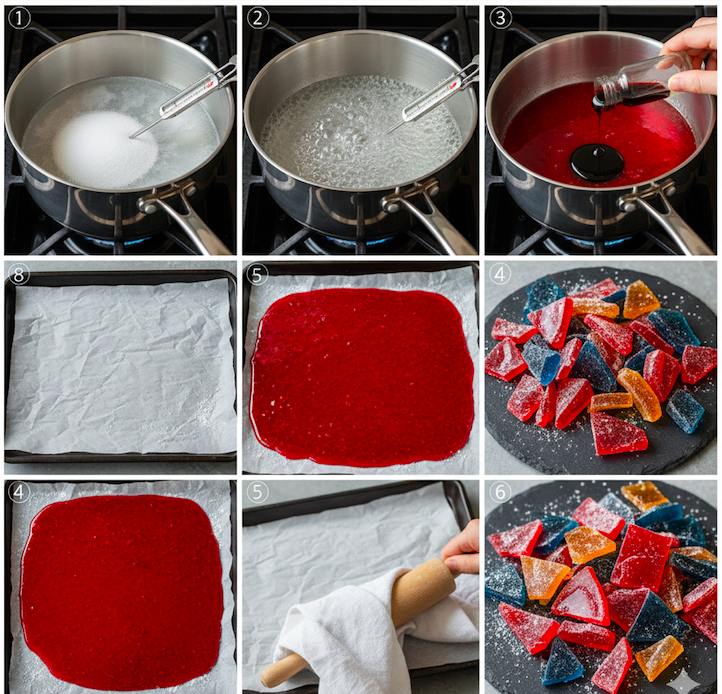
- Prepare your workspace by lining a large rimmed baking sheet (approximately 13×18 inches) with parchment paper. Lightly dust with powdered sugar to prevent sticking.
- Set up your candy thermometer by clipping it to the side of a heavy-bottomed saucepan, ensuring the tip doesn’t touch the bottom of the pan.
Cooking Phase
- Combine base ingredients in your saucepan: sugar, corn syrup, and water. Stir gently with a wooden spoon just until the sugar is moistened – avoid over-stirring.
- Begin heating the mixture over medium-high heat without stirring. Allow it to come to a rolling boil, watching carefully as the temperature rises.
- Monitor temperature closely as the mixture progresses through the candy stages. You’re aiming for the hard crack stage at 300-310°F (149-154°C). This typically takes 15-20 minutes.
- Test for doneness by dropping a small amount into cold water – it should form hard, brittle threads that snap cleanly.
Finishing Phase
- Remove from heat immediately once you reach 300°F. The mixture will be extremely hot and continue cooking from residual heat.
- Add coloring and flavoring quickly but carefully. Work fast as the mixture begins to set within minutes. Stir just enough to incorporate evenly.
- Pour onto prepared baking sheet in a thin, even layer. Tilt the pan gently to spread the mixture, aiming for about ¼-inch thickness.
- Cool completely for 2-3 hours at room temperature. The candy is ready when it’s completely hard and cool to the touch.
- Break into pieces by covering with a clean kitchen towel and gently tapping with a rolling pin or meat mallet. Create irregular, glass-like shards of varying sizes.
Pro Tips & Serving Suggestions
Success Tips:
- Humidity matters: Avoid making this candy on rainy or very humid days, as sugar absorbs moisture from the air
- Temperature precision: Invest in a quality candy thermometer for consistent results
- Work quickly: Have all your coloring and flavoring ready before you start cooking
- Safety first: Molten sugar is extremely hot – keep children away and have cold water nearby
Presentation Ideas:
- Arrange pieces on dark plates or mirrors for maximum visual impact
- Use as edible “glass” for Halloween haunted house displays
- Create colorful layers by making multiple batches in different colors
- Incorporate into dessert presentations as dramatic garnish
Flavor Variations:
- Classic Clear: Use only vanilla extract for traditional “glass” appearance
- Colored Glass: Add blue for “ice,” green for “sea glass,” or red for “ruby glass”
- Flavored Options: Try peppermint for holidays, lemon for summer, or cinnamon for autumn
Storage & Reheating:
Store in an airtight container with parchment paper between layers. Properly stored Broken Glass candy will keep for up to 3 weeks at room temperature. Avoid refrigeration, as condensation will make the candy sticky. This candy cannot be reheated once set.
Nutritional Information
Per serving (approximately 1.3 oz):
- Calories: 145
- Total Fat: 0g
- Total Carbohydrates: 37g
- Sugars: 37g
- Protein: 0g
- Sodium: 5mg
Note: Nutritional values are approximate and may vary based on specific ingredients used and serving size.
Frequently Asked Questions (FAQ)
Q: Why did my candy turn out cloudy instead of clear?
A: Cloudy candy usually results from stirring the mixture while it’s cooking or from impurities in your ingredients. Make sure to use clean equipment and avoid stirring once the mixture starts boiling. Also, ensure your sugar is fresh and your water is clean.
Q: Can I make this recipe without corn syrup?
A: While corn syrup helps prevent crystallization and creates the best texture, you can substitute with honey or golden syrup. However, these alternatives may slightly alter the color and final texture of your candy.
Q: How do I prevent the candy from sticking to the pan?
A: Proper preparation is key – use parchment paper and dust lightly with powdered sugar. If you don’t have parchment, you can lightly oil the pan, but this may affect the clarity of your finished candy.
Q: What’s the best way to clean up after making this recipe?
A: Fill your saucepan with hot water immediately after use and let it soak. The residual sugar will dissolve easily. For stuck-on bits, bring water to a boil in the pan to melt away any remaining candy.
Q: Can I add mix-ins like nuts or dried fruit?
A: While you can add small amounts of heat-resistant ingredients, they will affect the “glass” appearance. For best visual results, stick to extracts and coloring only. Save mix-ins for other candy recipes where appearance is less critical.
Conclusion
Broken Window Glass candy represents the perfect fusion of culinary science and edible art. This remarkable recipe transforms everyday pantry staples into something that will leave your guests questioning what they’re seeing – and then delighting in what they’re tasting. The process itself is almost meditative, watching sugar transform from granules to liquid gold to crystal-clear “glass.”
Whether you’re planning a themed party, looking for a unique gift, or simply want to try your hand at candy making, this recipe delivers impressive results with minimal ingredients and equipment. The key lies in patience, precision, and embracing the magic that happens when sugar reaches its perfect temperature.
Ready to create your own edible masterpiece? Gather your ingredients, set aside an afternoon, and prepare to amaze yourself with this stunning confection. Don’t forget to share your creations and let us know how your Broken Glass candy turned out – we love seeing the beautiful variations our readers create!
Have you tried this recipe? Share your photos and tips in the comments below, and don’t forget to rate the recipe to help other candy makers!

